Style Arc Mila + double gauze = great travel dress

Yes, it really is me and I have moved to nottionallybetter.com – so please come over and see me there. Obviously there has been a bit going on around here – all of it excellent, I’m pleased to say.

But, you’re here for the sewing so let’s get on with it. I have to say up front, I really like this dress. It is everything I want in clothes – cool, comfortable and just slightly out of the ordinary. What do you think?

20160508_084130_Fotor

Style Arc Mila

Yeah, I know. Apologies for the crappy pics (some things don’t change around here). I now have a remote but need more practice. But the cat likes it.

This is a great, simple pattern that goes together really easily and should be quite quick to make. I say should be, because I made it all a little more difficult for myself. I hate pattern matching and then made it in a check (or plaid) without making a muslin. Don’t really know why I wrote that – I would never make a muslin for something like this anyway. Although my check matching is not too bad really.

But I was so focused on matching at the centre front seam that I cut two identical pieces. Yes, identical – not mirror image! Which is how the neck facing came to hand stitched down all round  – I had to do something while I waited for another piece of the fabric to dry so that I could recut it.

20160508_084447_Fotor

And I do think it is slightly too big. This is a size 20 – I’m sure the 18 would be fine. But I seem to be just on the cusp for Style Arc sizes and go back and forth between 18 and 20 – not always wisely. I made the Sian combo top in size 18 and it’s good, might benefit from a small FBA but really it gets worn a lot. So then I made the Amber blouse (not blogged) in a size 20 – way, way too big. And then I made the Skye top in a 20 and it is too small – needs a 1 inch FBA. And no it’s not blogged either. And, yes, I may have bought a few Style Arc patterns in one of their sales.

Hotel room selfie

Hotel room selfie

I also made it in double gauze – which is fabulous and a great pairing I think. it certainly makes this an excellent travel dress. (I am wearing it right now in a Bangkok hotel room). So you also get a hotel room selfie.

I will be back again soon as I work on my unblogged backlog. 

And apologies – pressed publish not preview – I am so out of practice at blogging!

A Tale of Two Suttons

I have such a long blogging queue…. and such a large UFO pile. Well large for me anyway. I have usually been a one project at a time kind of sewer. I blame the work shirts. I just can’t seem to get motivated to finish them but that’s a tale for another day.

But back to the Sutton Blouses since that’s why we’re here. These are the Sutton Blouse by True Bias yet again. Along with not finishing my work shirts I have been doing some experimenting with the kind of results one might expect from experiments – that is very mixed. But I didn’t want to blog a succession of almost failures so I will get to them as I make better versions (or decide to scrap them). So because of this I also desperately needed a guaranteed good result which is what I got which is what I would have gotten had I chosen my fabric more carefully.

I used this lovely silk/cotton blend because I love the colours and wanted something more than rayon had to offer, which apparently was mainly lack of drape.

IMGP6290_Fotor_Fotor

Sutton Blouse

Sorry for the strange expression but the cat was attempting to photobomb and distracted me. Obviously not nearly enough drape, which makes everything stick out awkwardly.

IMGP6289_Fotor_Fotor

Even from the back those sleeves just stand straight up. And you still can’t appreciate the fabric so here’s a better shot of it.

IMGP5729_Fotor

So unfortunately basically a failure, although I must admit that I still really like the fabric so it won’t be wasted (although I am still not sure what I am going to do with it). I prewashed it in the machine (I know, but you may as well start as you intend to proceed) on delicate in cold water and line dried it with no apparent adverse effects and very minimal shrinkage.

I then went on to some more experiments, which as I said, I will come back to. And of course, after yet more experiments I again needed a guaranteed good result so yes, I made yet another Sutton. But this time I was sensible and used rayon.

IMGP6915_Fotor

Sutton Blouse by True Bias

See, isn’t that better. It will look even better with jeans, which is how I will usually wear it but it is still very hot here (I know I say that all the time) and I couldn’t face jeans in the daytime.

IMGP6911_Fotor

The eagle-eyed among you may have noticed that this has lost the high-low hem of the original design and therefore the side splits. I wanted quick and easy and so just rounded the sides of the front hem and shortened the back to the same length. This means that I can finish up to the sleeves as per the pattern instructions (which are excellent) and then hem front and back before joining the side seams. I like doing it this way when I have a rounded hem as it makes it easier to get an even finish at the hemline. (And no I didn’t think to photograph it and now the camera batteries are flat.)

I did make the same size (18 if I remember correctly but definitely the biggest size) as my original Sutton Blouse but I did also remove the extra length I added the first time.

So now I should get back to those blasted work shirts, although I am now thinking I could also wear this in a pinch…. and I have a couple more rayons in the stash.

What about you? Are you a one project at a time kind of sewer? Or do you have multiple things on the go?

New to me pattern source and free patterns

As I have been pondering my style and what i want to make I have been browsing patterns for far too many hours. While many of these hours could probably have been put to better use, I did find a completely new-to-me source of patterns at sewingpatterns.com. They have patterns from many the usual suspects plus burda, hot patterns, La Fred and neue mode. They also have a small selection of free patterns as well, so you can give them a go at no cost.

They recently added this one as a free pattern, which would have really annoyed me since I had recently bought it, except that I only paid $1.99 so I am not bothered.

neu22676

Probably the best thing from my point of view is that they always seem to have something on sale. Currently Simplicity are $2.99 or $3.99 for download, including Autumn 2015 I believe. A few weeks ago I bought several Burda patterns when they were $1.99 to download.

8108burb

I have made a first version/muslin of the top from this and will be making a proper one soon. This will be good for work. I also intend to make the jacket when the weather cools down.

7806bur

I also have this dress pattern which also comes without the tie front. I think this could be a good canvas for some bold fabrics, although it does have a CF seam.

bur7094

This one is just for fun. It will either be fabulous or disastrous but I was really drawn to it.

From what I’ve seen so far, these come with seam allowances and ‘proper’ instructions. So if that’s been holding you back from giving Burda a try, this may be an option for you.

I also bought far too many neue mode patterns, whom I have never even heard of before, when they too were on sale for $1.99. Many of their patterns are available up to size 30 which is a bonus. They also have a very wide range of styles including what appears to be their entire back catalogue. Speaking of back catalogue, I am currently working on this one, which is most definitely not current.

neu20540

I know, it is very eighties. Like very, very eighties. But I really like the extended angular overlap in View I. As I said, I am working on this now and so far, so good. But do be aware that the older patterns (at least) are scans of the original pattern from the paper version and so include many, many pages which you will not need to print. You definitely want to spend a few minutes to see which pages are the actual pattern and which are things like size charts.

Also be aware that these do not have seam allowances (except for some recent US releases) and the written instructions in English are very ordinary, although they do include good diagrams. The instructions are also in several languages, Dutch, French and German maybe, if you can read those.

I will be back with a full review when it’s finished to let you know how it went.

So have you used sewingpatterns.com or neue mode? Did they work for you?

Lekala free blouse pattern

Hi all. I have been doing some experimenting, which has been fun, but has not resulted in many actual finished garments and even less photos of said garments. So this is just a muslin and has since gone in the charity bag.

IMGP6294_Fotor

Lekala # 5446

Ah, yes Weewan (the cat) has photobombed every shot.

This is the free Classical Blouse #5446. If you want to give Lekala a try, it is a good place to start. I did add adjustments for a low bust point and wide set breasts (I think – it was a while ago). It is very comfortable and very importantly the sleeves fit well with no restrictions on movement. The only changes I would make will be to narrow the shoulders when I make one to actually wear. Oh, and reduce the collar size a little.

IMGP6296_Fotor

The awkward stickyoutedness at the front hem is because the interfacing I used was far too stiff and heavy and the fabric wasn’t great either, just some cheap poly/cotton with limited drape.

IMGP6295_Fotor

Having had tremendous success with previous Lekala patterns, such as my still-very-much-loved denim skirt and H’s shirts, I don’t know why I have not used them more. Although I have rectified that now as I have another blouse finished awaiting pics and yet another printed taped and ready to cut which I hope to get to shortly. I have also tried the narrow shoulder adjustment on the latest one so will let you know how that goes.

I know that you are all thinking “What? She’s not blogged in weeks, talk about experimenting and comes up with this?” I have been experimenting but then that got sidelined by the need for some work appropriate shirts/blouses. For the last 3 years my work clothes have only been needed for the occasional skype/video conference but now I have a new client and will need to meet face to face a couple of times a month. So I am in dire need of new clothes.

And after all that, I am not going to be making another version of this blouse at the moment. There is nothing wrong with it and in fact I am impressed with the pattern and the fit. And I can see me using this in the future but I have also experimented with some other patterns which are much more interesting. I hope to be back with some of those soon.

Have you tried Lekala? How did it go?

I successfully threaded my new overlocker!!!!!!

And yes, it IS a big deal. And yes, I am very proud of myself. Because my overlocker is very scary. See….

IMGP6124_Fotor

I have wanted an overlocker/serger (or overedging sewing machine as the manual calls this one) for a long time. I sew pretty much exclusively with cotton and/or linen. I also have quite a lot of handwoven cotton which hasn’t been sewn because it involves FRAYING – lots of it. Which also means either French or flat-felled seams most of the time. Now most of the time, that is fine. However, when I just want to make a simple, summer top (for example) it turns what should be a relatively quick make into something much more time consuming. It also means that the finish is often way better than the fabric calls for. For example, my first version of the Sian Combo Top uses scraps of $1.00 rayon so I don’t expect it to last long but it has French seams everywhere.

Now where I live has precious few sewing machine shops. There are fortunately more fabric stores. This is because the sewing market here largely caters to people buying fabric to have made up by a local tailor. Of which there are many. It is quite common here to have professional and/or formal clothes tailor made. Because of this many sewing machine shops (and nearby Chiang Mai has a lot) cater to tailors and therefore stock semi-industrial or industrial machines. This means that they stock a lot of Juki and also Jack, which seems to be a slightly less expensive version of Juki.

So when it comes to overlockers you either buy something like mine, which at just over $100US seemed like a bargain, or a much less scary looking Juki, which at over $400US seemed like less of a bargain. I did ask a couple of tailors and a curtain maker and they all had one just like mine. They have a great reputation for just working well for a long time.

IMGP6117_Fotor

Probably the biggest surprise when I tried this in the shop was how quiet it is. Given how much I have read about the comparative noisiness of overlockers, I expected this to make a racket. But it isn’t any noisier than my machine and my new machine is quieter than my old one. I think a lot of this is because while the motor and base are bolted to the table (which came with it) the machine itself just sits on rubber feet within the base. So there is no movement during use and therefore I guess no rattling or other noise. Anyway, I am very impressed.

To say I was nervous about threading this would be a massive understatement. These are the instructions for threading the Small Looper.

IMGP6125_Fotor

No handy colour coded charts here. And note that the written text is what to do before you start threading. The actual instructions are Thread in order as indicated by arrows 29-30-32-34-36-37-38-40-42-43. That is it!

Despite this my first attempt was very close. I changed one thread at a time so that if when it didn’t work I would know which one was the problem. But never fear, YouTube to the rescue. I found a very helpful video in Spanish no less and successfully threaded my very scary overlocker! And yes, it did come threaded with normal spools of white thread but white isn’t a useful colour for me and so the very first thing I had to do was thread it. And I’m so glad that I just had to get over this immediately (well it took a couple of days) as it otherwise would have grown in my imagination into an overwhelmingly difficult task. And it really wasn’t that difficult.

Now just watch me make all the things!!!

Style Arc Sian Combo Top

Not that long ago Style Arc had a sale in their Etsy shop so I bought a couple of patterns. First up is the Sian Combo Top. A quick search reveals very few (like 3) reviews and/or images of this top. But two out of the three reviews were quite positive and the third simply felt like it wasn’t right for her.

I was drawn to this pattern as I am constantly on the lookout for tops in simple shapes where great fabric can be showcased so that multiple versions do not look too similar. And of course, offer the opportunity for colour and/or fabric blocking. Style Arc describes it as;

This great wardrobe staple features a flattering dropped shoulder and a comfortable silhouette. Create your own style using different textures or colours; knit or woven fabric. The combinations are endless. Optional contrast side panels.

So here’s my version.

Style Arc Sian Combo Top

Style Arc Sian Combo Top

I made a size 18 with no alterations in a scrap of cheap rayon and some very gorgeous Japanese spun cotton. A quick internet search reveals not much but according to Ask.com, spun cotton is;

Ring-spun cotton are cotton fiber strands that are continually twisted and thinned until a fine rope of cotton fibers remains. This process makes the short hairs of cotton stand out from the rope, which makes it stronger and softer as a result.

I presume that ring-spun and just spun are the same but if anyone can shed any more light on this, I’d appreciate it.

This fabric feels divine. Because it is spun it is very soft and very light and this version has a slight sheen but not enough to call it shiney. Unfortunately, it seems to be intended as men’s shirting which means a very limited colour palette and no prints.  So I just bought some of all the blues available and some black. Which means that I bought every colour they had except for white and ivory because they are not colours that I can wear.

But back to the top. You can’t see it in this picture but I changed the back neck gathers into an inverted pleat. I am just not a gather type person. This was particularly easy to do as there is a pattern piece for a back neck guide. This is intended to ensure that the size and shape of the back neck are correct after gathering but also made changing it to a pleat very simple.

IMGP5895_Fotor

I used French seams throughout and I think this may have made it a tad smaller than it should be. Because Style Arc use 1cm seam allowances (generally speaking) those French seams need to be very accurate and I think I was a little off. Having said that I need to go up a size anyway. I cut this out weeks ago so can’t remember the details but I thought that the finished garment sizes indicated that the size 18 would be ok but it isn’t, as you can see from this very bad photo.

IMGP5898_Fotor_Fotor

As you can see, there is significant pulling at the bust and the side seams are pulled forward. What you can only just see is that I didn’t do a forward shoulder adjustment and it definitely needs that. Check out that shoulder seam position. Next time I will also lengthen it, although less than it looks like it needs since if it fits properly it won’t be pulling up in the front as it is now.

I am looking forward to using this pattern again as I think it could turn into a real wardrobe staple and offers the opportunity to use lots of those not quite big enough but too big to throw out scraps.

So have you made the Sian Combo Top? Or have you used spun cotton?

Tessutti Pia

This has been a long time in the making. I first muslined the Tessuti Pia last year and realised to my horror that the XL bust size was 101cm NOT 110 cm, which is what I mistakenly saw it as. Now my bust measures 116cm so my presumed need for an extra 6cm turned into an extra 15cm (at least). So the whole idea lost its allure.

But then I was going to visit my family in Australia and somehow the idea of a Pia dress to travel in got lodged in my brain and would not be ignored. So I used this fabulous double gauze

IMGP5267_Fotor

and created this

IMGP5888_Fotor

But first I had to make a few on the fly adjustments. Somehow in my grading up and adding an FBA I ended up with significant gaping at the front armscythe. My solution was to raise the front at the shoulder and to take it in at the underarm side seam. This has fixed the gaping but has shortened it in the front and raised the neckline. I have adjusted the pattern now so it should be fine next time. I am really pleased with the back. Yeah, I know I don’t really know why either.

IMGP5891_Fotor

So how did it go as a travel dress? It was perfect. Completely comfortable for the entire 12 hour trip. It was 42 degrees when I left home but I was cool in this and then when I left (I wore it on both flights) it was about 20 degrees and I was still fine. I just took a (fake) pashmina to throw around my shoulders in case the plane got cold. And the double gauze was wrinkled but not nearly as much as I had thought and also it wrinkles in a it’s-meant-to-do-that kind of way. So it still looked good after two flights and an hour long bus trip.

I will make another one. But I’m not sure that it will be in this fabric after all

IMGP2169

I still really love this but am thinking that perhaps a simpler pattern would let the fabric really shine. I am really drawn to the Tessutti Sophie. Check these out by Lara and Anna and Barbara – aren’t they fabulous? But again the sizing will be a problem. The largest bust measurement for the Sophie is 106cm, which is better than 101cm, but still a significant adjustment. I have spent considerable time looking but haven’t found a similar silhouette anywhere else.

Can you suggest a similar pattern? Or have you graded the Sophie? I’d love to hear from you.

My 19th birthday present

Yes, my Mum and Dad were kind enough to get this beauty for me all those years ago. Like over 30 years ago – yikes! And now she has come home with me for the first time in decades.

IMGP5762_Fotor

For many reasons she has been living with my Mum but now I’ve brought her home. I was recently visiting my family and offered to make my sister a pair of jeans so out she came. What a joy! Denim in multiple layers – no problem. Terrific topstitching – but of course. This machine is sooo much better than my Janome, even though they are both quite basic machines. So I had no choice – into the suitcase she went.

You can almost make out my Janome lurking behind and look at how little she is. (The Janome has a cream cover on her). There is so much more room to work with the Singer. It is also obvious how much more metal is in the Singer, she certainly is heavier so there won’t be so much annoying bouncing around. And she is so much smoother and quieter and that is without ever having been serviced. (Admittedly she hasn’t seen a lot of use in recent years). So she is off to the sewing machine repair man tomorrow because I know that if I start using her she’ll never get the service she deserves.

I did also have a bit of a pre-holiday sewing frenzy so will be back with some finished garments as soon as I take some photos. Hopefully only a day or two. See you then.

A shirt and a bit of navel gazing

Sorry, this is a bit of a rambling post but I am tired of chasing thoughts around in my own head. I need to share:) So apparently I can’t sew when it’s too hot. Or at least I can only sew very slowly for a short time. Seriously, it is 40 degrees here and it is a slow process actually getting anything made. The sweat drops made the ink run on the pattern pieces as I was cutting out. And don’t talk to me about tearing pattern pieces that have become wet (more sweat) and then stick to your already sticky hands (with yes, more sweat).

I have made a Sutton blouse for both my Mum and my sister but as they are gifts no pics for now. Although I  must say that it is a great pattern for gifts as the fit is quite forgiving, which makes fitting so much easier when you live on different continents.
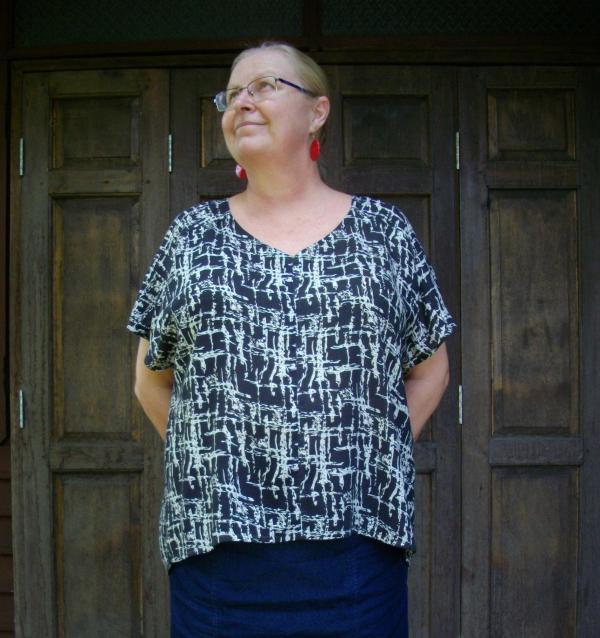
IMGP4434_Fotor

My Sutton blouse

Making these also gave me the opportunity to try the size 16. If you remember, when I made it for myself I was unsure about the sizing and the extra length which I added. So the size 16 is too small. It fits but would need an FBA and the 18 is better anyway I think. But the length of the 16 was also ok (not lengthened). So next time I make it, I will use the straight size 18. So that’s good to know.

I also have a shirt for H which is nearly finished but then I’ve thought it has been nearly finished for several days now. Like I said  whined earlier, it’s hard to sew in the heat. I actually cut out two shirts and chose fabrics based on the ability to use the same thread so that I could sew them production line style. We decided on these two;

IMGP3328_Fotor_Fotor_Collage

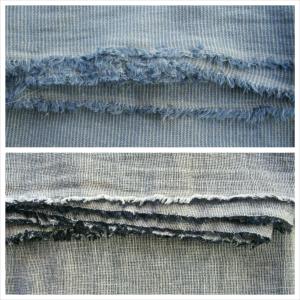
Cotton/linen for shirts

Both gorgeous lightweight, cotton/linen mix. (Yes, there is similar in the shop) H is the understated type so prefers matching topstitching rather than contrast, so cream thread was good for both. From what I’ve read about production sewing, I would have these whipped up in no time. Or not. Apparently, production line sewing doesn’t work for me. Apparently I need the steady sense of accomplishment as each step is completed. Quickly, as in one shirt, not slowly as in two shirts. So now I’m just focused on getting one finished by Friday. It’s our wedding anniversary – 22 years – how is that possible already?

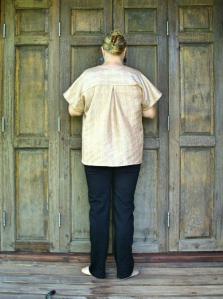
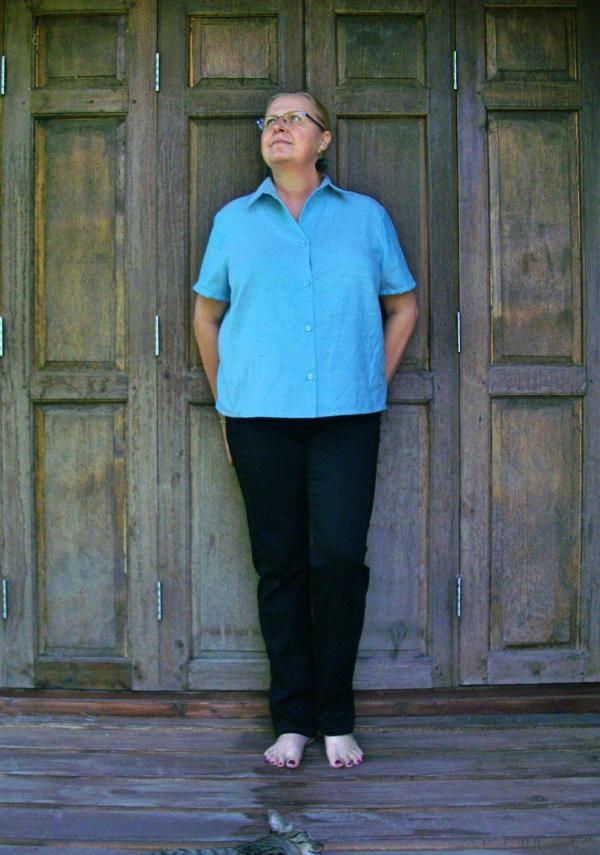
UPDATE: The shirt was finished on time so here it is.

IMGP5664_Fotor

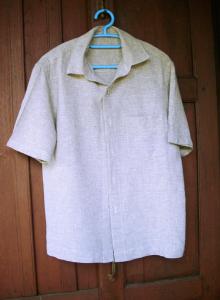
Not much to say about this pattern that I haven’t said before either here or here. I did narrow the collar and stand by 3mm and will hopefully remember to narrow the front placket next time as well. I also used muslin instead of interfacing on the placket, collar and collar stand, and I must admit I will do that again. I really like it.

IMGP5665_Fotor

A very invisible pocket and a small glimpse of the sleeve cuff. Not that you can really see it. Because this fabric is nearly identical on both sides, I turned up a narrow cuff and topstitched it down. Perhaps you can see a little more in this photo.

IMGP5666_Fotor

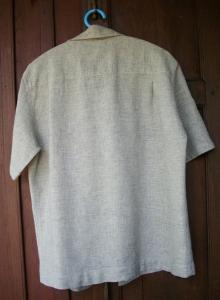
I also changed the centre back pleat to two side pleats. I simply copied a RTW shirt for placement.

IMGP5668_Fotor

As well as not sewing, I have been spending an awful lot of time trying to decide just what I might like to sew for myself. You see I’m at something of a crossroads style wise. It has only just dawned on me, well I’ve had an inkling for a while but it has now completely hit me, that I can make anything I like. I know, for an intelligent woman, I can be awfully slow sometimes:) And then I realised that I am making bog-standard copies of bog-standard RTW because that is what I would otherwise have bought. Absolutely nothing wrong with that. Except that for years my criteria has been

a) available in my size (Thailand and then enormous steroid-related weight gain) or

b) suitable for where I was living (The Middle East) or

c) covered the eczema on my arms and legs.

It has literally been years since I have thought about what I would wear if I could wear anything I wanted. And I can now wear anything I want . I’m back in Thailand, but can sew, and I am well. I still have steroid-stomach but most of the other excess weight is gone and no eczema. I repeat, I can now wear anything I want. That is both fantastically liberating and at the same time fantastically terrifying. There are now no excuses. I have to decide what I want to be wearing, how I want to present myself to the world, what look I desire, what impact am I looking to make.

With that in mind I have decided to take my time and actually work out what I want to wear. But then I shall be back with some pretty fabulous sewing. I am determined… no more boring, no more, it’ll do, definitely no more well that’s what everyone’s wearing or making. I’m looking forward to this….

UPDATE: We have finally had some thunderstorms and now it is only 36 or 37 degrees so I am sewing again! And Style Arc are having a 25% off sale until end of April in their Etsy store.  Now I really think I will be back soon with something a little more interesting.

Amazing creases

I just saw this really interesting piece on feather workers and creasers working on the Chanel show. I had no idea that that was how they make those stunning geometric creases. I guess they are called creases, since pleats are actually created by creasers apparently. Who knew?

Just thought you might enjoy it too. It is only about 6 min long too.

http://www.france24.com/en/20150306-you-are-here-fashion-secrets-haute-couture-chanel-france/